The Inspired Room

Refining Your Home for Authentic Living™

Solving Flaws: Creative Concealment June 30, 2008

Filed under: Creative Before & After,Decorating Inspiration — Melissa @ The Inspired Room @ 1:00 am
Tags: ,

Do you ever watch TLC’s What Not To Wear? I got addicted to that show about a year and a half ago and for a few weeks I watched every episode. While I have always tried to look at least somewhat presentable, for awhile my uniform every day was jeans, Keds and white teeshirt. Nothing wrong with that for a busy mom, but from watching that show, I learned so much about how to focus on my better features and hide my figure flaws.

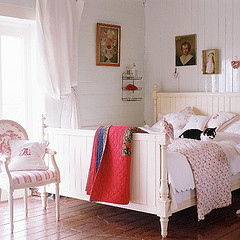
Another creative concealment made with fabric!

Same can be true of how we dress our houses. We don’t all have the luxury of a brand new perfect custom house or the ability to redesign every flaw in our home. Likewise, we don’t all have a perfect bod or the desire or money for plastic surgery — ah, yes, make mine a size two with no cellulite please, and a few inches taller while you are at it?, but we can make the best of what we have, imperfections and all.

I have used this technique to cover furniture more than once!
Even Pottery Barn gets into concealing! It can be a quick and inexpensive solution!

Who doesn’t have a bunch of miscellaneous necessities floating around the house?
If you don’t have enough closed storage, conceal stuff in simple boxes with labels. Bye bye mess!

I do not believe in house perfection or hiding everyday living. Even if it starts out perfect, I fully expect nicks and dings along the way. I am fine with scratches on my furniture, imperfect walls and even crooked floors. Those are what makes life charming, seeing a house is well lived in.

But, sometimes you just don’t want the glaring eyesores to steal the attention from beauty. I don’t think our houses should look unkempt or neglected or have areas that are just plain unattractive (at least permanently!). If we can fix things as an investment in our home, that is great. But sometimes we need to be content with concealing. There are ways around uglies even if you live in a rental or are on a budget.

Stacks of baskets or suitcases can not only hide flaws behind them
(cords, plumbing, old radiators), they can make short things taller,
AND they can hide uglies IN them!

  • Ugly Cords tangling from walls? Hide ’em behind a plant.
  • Old beat up or wimpy moldings? Paint them to match walls.
  • Less than lovely storage area? Hang a curtain!
  • Boring architecture? Hang some shutters for fool the eye substance!
  • Open storage where you need closed storage? Find baskets or shelf shades!
  • Ugly kitchen cabinets? Paint, new cabinet doors (on old cabinet boxes), or fabric can transform cabinetry for much less cost than new.
  • Too small of windows? Hang your curtains higher and wider to fool the eye!
  • Does your floor slope? Put taller things on the sloped end! It helps balance the room visually!
  • Electrical boxes, switches or ugly views from windows in your house where you wish there were none? Hang tapestries or artwork over them! Bye bye!

basement ceiling

Here is a creative concealment. An ugly basement ceiling was concealed with fabric!

DOOR BEFOREDOOR AFTER

Mismatched doors? We had a random oak door in our kitchen that
didn’t match our 1930’s style doors in the rest of the house.
Solution? Hello chalkboard paint!
Chalk board paint is almost the new duct tape.
Hey, yeah, duct tape? Another creative concealer! I’ve even used WHITE OUT as a creative concealer.
Not kidding.

READER SOLUTION:

Here is a clever reader’s idea for how to hide an air conditioner in the off season:

Ok, friends, now it is your turn.

I know most of my readers just like to look and not participate, that is OK! Don’t let me pressure you, but IF you are so brave as to show us how you have hidden the uglies around your house, we’d all be forever grateful to see we are not the only ones who conceal.

If you want to share a photo, an idea or suggestion, or a before and after, share in the comments or link up with Mr. Linky! I don’t think any links will show up until you click on Mr. Linky (then the list will appear). My Mr. Linky always lies and says “You’re First” even when you aren’t.

Feel free to check back over the next week to see if there were any brave souls willing to share! Feel free to share ideas in the comments too.

PS. I had to quit working on this post due to thunder and lightening, didn’t want to get electrocuted!

CLICK ON MR. LINKY TO LINK UP AND LEAVE A COMMENT REGARDING YOUR CONCEALMENT!

ALERT: MR. LINKY DISAPPEARED WITH ALL OF OUR LINKS!
SO SORRY, TRYING TO FIND HIM, I’LL BE BACK LATER..
.

Top photo: Cottage Living
Next photo: Pottery Barn
Next three photos: BHG

SEE MY CONCEALMENT: A DECORATING SECRET

Find home office concealments: here.


Fanciful Fun: A Tea & Costume Party! June 28, 2008

Filed under: Creative Inspiration & Projects — Melissa @ The Inspired Room @ 1:00 am

martha stewart sock and glove craft

Guess which one is me? I am all dressed up in my sock animal costume, ready for a party (and about to dive in to my little pastry)!
I must admit, I am rather embarrassed by the simplicity of my costume,
but it has been a rather busy week…besides, I rather like sock animal costumes.

After a few days of talking about myself and my life, I am sick of myself. Really, I’ve had it with ME. I am ready to escape the real world into the world of imagination for some fanciful fun. Will you join me? Come on, the real world gets oh-so-serious. Houses-sch-mouses, how much work they are, let’s leave them behind for awhile! I am sending you off this weekend to enjoy the creativity of some of the most talented and creative folks as they celebrate:

“A Mad Tea Party (of the costume variety)!”

Here, please try one! In honor of the festivities I have brought cupcakes (from Saint Cupcake in Portland, Oregon).

This event is hosted by one of my great blogging buddies Vanessa, who not only has inspired me to new heights of imagination and creativity, but she is a generous and sweet friend. I am so honored to know her. I enjoy chatting with her sometimes long after we should have shut down our computers — we get sillier and sillier as the night wears on. She cracks me up.

Vanessa contributed to my last Creative Inspiration Week and amazed us all with her creative genius, as she does each week on her amazing blog A Fanciful Twist. I definitely mean this, she is a creative genius. I adore this girl. Her festivities are not to be missed. So please, I send you off to her magical tea party to see what wondrous things she has planned! So, leave your cares behind and enjoy yourself!

Thanks for stopping by (please tell me, do you think I look silly in my costume?)! Don’t forget a cupcake on your way over! Please tell Vanessa I sent you! Now, hurry on, have fun! Be sure to click on the party links in her sidebar to see all the people participating!

P.S. Congratulations, Miss V on 200 posts!

Instructions for Martha Stewart’s sock and glove critters can be found here.
 

Sweet Escape: The Beach House June 27, 2008

Filed under: Decorating Inspiration,Sweet Escape — Melissa @ The Inspired Room @ 1:00 am
Tags: ,

beach house view and hot tub

When my parents decided to buy this beach house about 13 or 14 years ago, we were thrilled. Our girls were young and we really couldn’t afford to go on regular vacations involving planes and hotels. This house is about an hour and a half drive from our home, so it has provided many weekend, summer and holiday trips for our family. The house wasn’t fancy, but it was a place to gather and escape from the world.

One of our favorite traditions at the beach house centers around the 4th of July. We barbecue in the afternoon on the back deck, and then head to Manzanita (another cute beach town just down the road) and sit on the beach to watch a fabulous fireworks display. We build a fire to roast marshmallows and build S’mores. We lay on our backs all huddled together to see the fireworks. I wouldn’t trade those simple cherished memories for anything. We’ve had many sweet escapes to the beach, with our extended family, vacations with just our own family and times alone as a couple.

As promised yesterday, we will now tour the upper level, which serves as the main living area. Let’s head up the stairs for THE BEACH HOUSE TOUR, PART TWO! If you missed PART ONE, click here!

beach house stairs

That little black thing dangling from the railing is a dog leash. Notice the dog nose in the corner of the photo.

beach house

This is where you land when you get to the top of the stairs. Looking this way, you can see into the “sunroom.” If we just arrived at the top of the stairs, we would be looking at the view in the next photo.

beach house main room

So far, there is a dining table and china hutch here in the main room. The kitchen, dining and living area is all basically one room. More furniture will be here to make it cozy around the woodstove. The woodstove is covered in soapstone. The walls are Devine Paint in Dust.

woodstoveHere is the little woodstove, sitting on the pebbled surface. Perfect to warm up those blustery nights on the Oregon Coast.

beach house

So, if you look to the left at the top of the stairs, here is what you see. The kitchen and to the left there is a bathroom.

beach house

Here is the view from the dining table looking back towards the stairway. The big hole in the wall is for the video equipment and the bracket is for the flat screen. Yes, we considered having no TV at all, but sometimes you just want to watch a movie on a stormy night.

beach house

Another view looking back into the room, towards the stairway. That china hutch nearly didn’t make it up the stairs.

beach house kitchen

The kitchen was remodeled back when the house was first purchased so with the exception of a new fridge to match the appliances, not much needed to be done right now. Stuff is just sitting around on the counters so we’ll have to work on the layout. There is still some fixing going on with the paint, thus the white splotches.

beach house

If you step back to the other side of the room, you enter the “sunroom.” Now you can get a more sweeping view of the space and how it all connects. There is a tiled surface there above the bookcase so we can put plants or in the case of the wedding, a beverage station or food area. We’ll come back to this sunroom in a moment.

beach house

This is one end of the great room, by the staircase, with another little bookcase tucked in. To the right is a bathroom.

beach house bathroom

The door to the bathroom is a pocket door to save space. The walls in here are Devine Paint, Manzanita.

beach house bathroom shower

Here is the shower in this bathroom.

beach house bathroom floor

And for those detail minded folks who want to see everything, here is the floor, which is heated to keep our toesies warm.

beach house window seat

Now, my favorite spot (and Cubby’s favorite too), the window seat. Nice and wide, nice and long. Kids could have sleepovers here. We are going to have some cushions made to lean up against so we can while away the day reading magazines and sipping drinks. It was very hard to take a photo of this space because the sun was streaming in. The cushions are striped on top but I couldn’t capture that. The flat screen was sitting in this room but won’t be here forever. This is a quiet space for lounging.

beach house window seat

Here is the view from inside the room looking towards the window seat. For some reason I forgot to take a photo from the other side, but it has windows along that right wall too.

beach house window seat

Here is the other beach boy, Winston, snoozing on his own side of the window seat. Dogs love a sunny place to sleep. Notice the assorted action heroes strewn about.

beach house

Here is a view from the window seat area, looking to the bookcase on the half wall near the stairs, and into the bedroom. My parents will have this room, as they are the lucky ones who get to actually move in and stay here most of the year now. Up until now, it has been only a vacation home. But now it is going to be an every day home too.
beach houseThere are pocket doors to this room so they can have some peace and quiet when my son arrives.

beach house

I didn’t get a very full photo of the other main bath, but here is part of the room!

beach house shower

This bathroom has a shower. There are three full bathrooms now, up from the original two. Much more convenient for our family gatherings.

beach house exterior

This is one side of the back of the house, the new addition is on the left.

garage doors

A few of you have asked about the garage doors, so I will show them again and tell you a bit more.

folding garage doors

These doors were custom made, designed to match the front door, just in a set of three! They have special heavy duty hardware and tracks designed to withstand the harsh beach weather. There are drains for water along the top and bottom and a unique locking system. The doors are made out of Alder. The hardware was purchased from Eclipse Architecture in Vancouver B.C. through Loewen Window & Door Center, and the doors were manufactured to fit by Rogue Valley Door. Hope that helps!

folding garage doors

That is it for this edition of THE BEACH HOUSE. I’ll update with more photos as the wedding gets closer and furniture finds a home here! Thanks for coming on the tour. Wish you all could pop by for some lemonade (of course, if you did, I’d put you to work assembling wedding programs).

If you missed PART ONE of THE BEACH HOUSE TOUR, click here.

DON’T FORGET:

Gather up your CREATIVE CONCEALMENT IDEAS to share on Monday. Don’t be shy. Show us how you creatively hide the uglies around your house! Do you throw a table cloth over something to hide stuff under the table? Stash unpleasant items in a pretty basket? Hide an electrical outlet and cords with a plant? Hang a curtain over something less than lovely? Toss a throw over an old couch to give it new life? Do you do anything clever or pretty to conceal something else? Come on. I know some of you conceal and you are masters at it. I’ve seen your blogs and I have seen concealments. Yes I have. You just didn’t know what they were called. Please, share your ideas to inspire us and add your post to Mr. Linky on Monday!


The Beach House: Wedding Countdown & Utter Insanity June 26, 2008

Filed under: Decorating Inspiration — Melissa @ The Inspired Room @ 1:00 am
Tags:

the beach house backyard

As many of you know, my daughter is getting married in two months (TWO MONTHS? Holy cow.) Five months ago it seemed like a great idea to have the reception at our family’s beach house near Cannon Beach in Oregon. We’ve vacationed there with our kids for the past 13 years, and now it will be better than ever. The house has been under remodel for nearly a year and a half, but we thought it would be done perhaps in March. Plenty of time for wedding reception decorating, non? That was optimistic. It is nearly the end of June and the house is finally ALMOST done.

The operative word here is ALMOST. The furniture is not in place yet, people. We have about 7 weeks to move in furniture, decorate the house, set up a wedding reception to serve 100 people following a wedding ceremony at a local church. Are we over ambitious? Can we do it? Can we do it with not enough help and no money? Stay tuned. The countdown has begun. You can be afraid for me. I don’t blame you. I know I am crazy.

Cubby the Dog

Meet Cubby. Even he is afraid things won’t get done, you can tell by the look on his face. He is one of the beach boys (he and Winston). Doesn’t he look smart in his beach scarf?

It wouldn’t be all that impossible, really, if we didn’t have to hold down jobs to pay for this event in the meantime. Or move my daughter’s stuff into her new home. Or decide on things like cupcakes, shoes and flowers. Or create programs for the wedding. Or if my husband wasn’t interviewing for jobs outside of our state that might involve selling our house and moving in 8-12 weeks. No biggie. Not much going on around my house. Just everyday chaos. But I’m not panicked. You’re all flying in to rescue me, right? Good. I love you guys.

garage doors

Here is the garage, the doors are finally in. These are folding garage doors that open to reveal a garage suitable for guests, partying or a car.

folding garage doors

The garage floor is heated so once it is all finished it can double as a guest room or game room.
I love rooms with more than one use.

front door

Front door with reflection of outhouse in window. The outhouse must go before the wedding.
Either that or we’ll have to decorate it.

staircase

The wood walls in the house are hemlock. It will stay light and not change color over time.

arch and bookcase

This is looking down one hallway towards an office on the first level. The paint is Devine Paint, Manzanita. The stone floors are easy care so we can walk in with wet or sandy feet and not do any damage.

Antler chandelier

The whole office top to bottom is lined with hemlock. The antler chandelier is my dad’s choice in lighting. Manly.

office glass door

The office has french doors to the hall.

view from office

This is kind of dark, but you can see the office has a view looking over the deck, hot tub and the ocean. I wouldn’t be able to concentrate on working, I’d be daydreaming about that hot tub.

hallway

This is looking back from the office to the hall. Again, the paint color is Manzanita from Devine Paint.

bathroom

This is the lower level bath, viewed from the hall. Still the same paint color on the walls.

china hutch bathroom vanity

The bathroom vanity was made from the lower half of a china cabinet.

curved shower rod

This is the curved shower rod. This is the way to go if you like a little more elbow room!

deep soaking tub

This is an extra deep soaking tub for those late night bubble baths.
The hand held shower is mounted on the wall.
I like hand held showers for cleaning tubs and washing kids hair.
No more water in their eyes!

laundry room

This is the laundry room, the cupboard is the top of a hutch found at a consignment shop, cut off from the lower cabinet now in the bathroom. We’ll fill it with cute containers and things so it will look nice through the glass doors! It has lights inside for ambience.
Will we have enough time to fluff this space before the wedding? Good thing I work best under pressure.
The wall paint color is Manzanita from Devine Paint.

laundry room back door

The door goes outside to the covered porch and barbecue on the side of the house.

coat rack

Coat rack and bench in laundry area.

laundry sink

A close up of the laundry sink.

I forgot to take new photos of the two bedrooms on the first floor, but they hadn’t changed much. Next time I go I’ll take photo updates for you. You can see one of them by looking at my last beach house update here.

Come back on FRIDAY if you can, I will finish the beach house tour (CLICK HERE FOR PART TWO) and take ya’all UPSTAIRS to the main level! I’ll show you our giant new window seat, one of my favorite things (next to the hot tub, that is)!

LET’S TAKE A VACATION:
In addition to my real vacation spot in today’s and tomorrow’s posts, I’m sharing this dreamy vacation (and links to other favorites) for my new blogging friend Holly’s Let’s Go On Vacation Post. Go check out everyone’s dreamy vacation ideas, both real or imagined! The budget way to travel! Have fun, but before you take off, check out this announcement:

ANNOUNCEMENT: Don’t forget to look around for a creative concealment to share with us. Unless you are a millionaire who loves to spend spend spend, I bet you have a concealment somewhere. Look around or make one up over the weekend and link back on Monday so we call all be inspired. It doesn’t have to be fancy. Small concealments are welcome!


Creative Concealment: A Decorating Secret June 24, 2008

Filed under: Creative Before & After — Melissa @ The Inspired Room @ 2:16 pm
Tags:

creatively conceal an electrical box

Southern Living

CREATIVE CONCEALMENT: THE SECRET TO DECORATING ON A BUDGET

As I promised back in the day (sorry for my slowness), I wanted to share in more detail one of my decorating methods sure to shock anybody out there with money to burn. I call it CREATIVE CONCEALMENT. This is not Architectural Digest material, folks. So if you are going to be appalled, step away from the blogs right now. I’ll excuse you and not take offense. Now, this method won’t really be a surprise those of you who face the same issues I do, namely: lack of time and money. Eh hem. If we had a lot of both, we could do whatever we wanted. But, to make things pretty when you have “limitations” you have to think outside the box.

faux brick
Jeremy Samuelson Cottage Living

In the house I live in now, we had to do some major creative thinking. There were some real eyesores that had been added to this house, and we absolutely couldn’t afford $15,000 to $40,000+ to redesign several issues when we had other expensive things like a kitchen to update. So, we did our very best to “conceal” rather than “fix perfectly” whenever possible. We can always fix later if time and money allow.

Here is what I mean. Prepare for some gasps of horror! Here is my office, before. This photo doesn’t even do justice to how the room looked. Every wall was painted a hideous color. Some yellow, some orange, some pink. You can’t see that in this photo.

WINDOW: BEFORE

before photo

That window was so out of character both in size and scale for our 1930’s house. In a contemporary setting perhaps it wouldn’t have been so bad, other than it was very poorly constructed. From the outside the whole dormer was atrocious (more on that in another edition of Creative Concealment!). But, in order to even put in a new window, the cost was going to be outrageous. So, as a way to put that expense off, we had to come up with a creative concealment.

The window was so large it exposed us to everyone walking by the house. Privacy and sun protection needed to be addressed. And with just using curtains, it looked ridiculous and messy from the outside! And those metal blinds had to go. So, here is what we came up with.

From the inside, creative concealment involved paint, curtains, old shutters (so the window would look good from the outside), a garden fence (to conceal poor construction and old ugly curtain brackets that I didn’t want hassle with removing!) and furnishings. While this after is not perfect or “done,” or magazine cover worthy, it is how things look right now. And that is the point. It isn’t about making something perfect, just better than it was so you can move on to other projects!

AFTER CREATIVE CONCEALMENT

concealed ugly window

Now, it is your turn. Let’s share ideas.

I want to see YOUR Creative Concealments. Show me anything from the big concealments to the little ones and everything in between. On Monday I will set up Mr. Linky again (blech, I don’t like Mr. Linky, but I don’t know any other way to do this) and if you want to share something you’ve successfully concealed, link up on Mr. Linky to your post! Only brave, authentic and real people need link up.

Note: If you spent a fortune redesigning something, than it is not creative concealment. We need to see your creative ideas for making something look better than it did using more ingenuity and creativity than money! Ugliness and unsightliness in all forms, CONCEALED! If you have before AND afters to share, that would be great! I’ve seen many of your ideas and I hope you will share them all with us here! Don’t forget to come back Monday to link up what you’ve creatively concealed in your house. I will also share some of your before and afters in subsequent editions of “Creative Concealments.”

I will share more of my concealments in subsequent posts. Yes, there are more. Lots more.

window beforewindow after

Creative Concealment: The act of camouflaging, hiding or disguising something that is ugly, distracting or unsightly with whatever creative means are necessary. This method requires far less money than resorting to the perfect solution, yet yields acceptable results that can be either temporary or permanent.

Creative Concealment ideas:

Use old shutters to hide or distract from problems
Accessories can hide a multitude of issues
Hang curtains to reshape windows
Plants or baskets can hide wall outlets or cords
Hang fabric panels to hide laundry areas or to create a makeshift closet
Creative furniture placement can visually reshape odd rooms or disguise other issues
Rugs can hide stained or worn flooring
Sprucing up an unsightly piece of furniture with paint or other creative means
Use wall hangings (shelves, photos, tapestries) to hide wall imperfections
Use fabric or place mats to drape over tables to change their appearance
Use fabric or blankets to hide worn places on old chairs or change their look entirely
Use paint to divert attention from less than lovely moldings, walls, floors, sidewalks or features
Table cloths that hide less than lovely necessities underneath

Related articles by The Inspired Room:

Creating Visual Serenity (Christian Women Online article)

All Authentic Living kindred spirits, here is a link to your button! Just copy code and paste to your sidebar!

<a href="https://theinspiredroom.wordpress.com" target="_blank"><img src="http://farm4.static.flickr.com/3099/2568453513_b6963ee0f1.jpg?v=0" alt="" width="175" height="230" /></a>

authentic living magazine


Outdoor Rooms: Secluded Spaces June 23, 2008

Filed under: Gardens & Outdoor Rooms — Melissa @ The Inspired Room @ 1:00 am

garden room

I spotted this lovely little secluded outdoor room on Choose the Write blog who saw it on Garden Rooms blog…isn’t it pretty? I can’t stop staring at it, I just love it. Such a perfect place for some morning solitude with a cup of tea!

I just got back into town after being away on business with my hubby, but I will be gathering up some more indoor decorating and outdoor room inspiration (including more beach house photos) and rejoining blog world shortly!

photo: Marie Claire via Garden Rooms blog